The Epson EcoTank ET-2800 and ET-2803 Sublimation Printers are great for converting to sublimation printing. This review will show you how easy it is to convert and how well it prints sublimation transfers.
We also show you the print settings to use for both Mac and Windows PC so you can get the best sublimation print that is vibrant and colorful.
This low cost sublimation printer will let you create custom clothing, personalized home decor, and unique gifts for everyone on your list. It is also great for starting your own home-based, small business selling your sublimated products as a side hustle.
One important thing to remember is that once you use sublimation ink in this inkjet printer, the warranty is instantly voided and you may not get any tech support from Epson at all. So buying a low cost printer to convert for sublimation is risky if you have problems.
This post may contain affiliate links. As an Amazon Associate, I earn from qualifying purchases. It means if you click and/or buy, we receive a small commission at zero additional cost to you. Read our Disclosure Policy for details.

![]()
Epson Ecotank ET-2800 ET-2803
- Affordable Epson printer to convert to sublimation
- 4 stars because it’s not the lowest cost
- Prints beautiful, vibrant sublimation transfers
- Perfect size for making custom key chains, earrings, Christmas Ornaments, Ceramic Coffee Mugs, Baby Bodysuits, Kids’ Shirts, and more!

About the Epson Ecotank ET-2800 ET-2803
Epson Ecotank printers offer cartridge-free printing with easy to fill ink tanks. They do not require cartridges with chips and this is what makes it one of the best printers to convert to sublimation.
The Epson WorkForce Printers are harder to convert and use for sublimation printing. The Epson Ecotank ET-2800 is very simple to convert! Which is why the EcoTanks are preferred over the WorkForce models to convert to sublimation.
The Epson Ecotank ET-2800 and ET-2803 came out in 2021 as a replacement for the Epson ET-2720 series. As of May 2023, the Manufacturer’s Suggested Retail Price (MSRP) is $200. This price can change based on availability, demand, and each retailer can also increase/decrease their prices.
The two models, ET-2800 and ET-2803, are the same exact printer models; the only difference is where they are sold. The ET-2803 are the retail models from Walmart and Target but the features and functions are the same as the ET-2800. Some ET-2803 have found their way to other online retailers such as Amazon.
These new printers are available in both black and white. The white ET-2800’s model number is C11CJ66202, the black ET-2800’s model number is C11CJ66201, and the ET-2803’s model number is C11CJ66203.
Printer Features
The ET-2800 are capable of printing, copying, and scanning. With sublimation printing, copying and scanning capabilities are not critical to have but they can be useful in other ways.
The printer has a small footprint so it’s great for small spaces. It measures approximately 15” x 7” x 13.5” (W x H x D) and weighs under 9 lbs.
The paper input tray is at the back so you will need a few inches of space behind the printer when your sublimation paper is loaded. It is capable of holding 100 sheets of plain paper.
a. Print Resolution
Epson’s proprietary MicroPiezo inkjet technology gives this ET-2800 and ET-2803 a max print resolution of 5760 x 1440 dpi.
This print resolution is perfect for printing highly detailed sublimation designs and gives your prints a true-to-life color.
b. Print Sizes
This printer is capable of printing various paper sizes to include:
- 4 x 6″
- 5 x 7″
- 8 x 10″
- 8.5 x 11″
- 8.5 x 14″
- 8.5 x 47″
As far as printing for sublimation, the 8.5x 11” and 8.5×14” are primarily used. They are big enough to print sublimation designs that can be used for various sublimation blanks such as:
- Earrings
- Key chains
- Christmas Ornaments
- Bag Tags
- Drink Coasters
- Ceramic Coffee Mugs
- Baby Bodysuits
- Kid’s Shirts
- Adult Shirts (XL and larger sizes may need a wide format printer)
If you are interested in sublimating larger items such as doormats, shirts or hoodies in sizes XL and larger, then you will need a wide format printer. You can either get a true sublimation printer that does not need to be converted (SG1000 or Epson F570 Pro) or convert a Wide Format Epson Ecotank.
c. OS Compatibility
The ET-2800 has drivers for both Windows and Mac OS. The printer comes with a CD-Rom but their drivers are also available directly from the website.
When setting up your printer, get the latest driver from Epson’s website so you are as up to date as possible.

d. Connectivity
The standard connectivity for this printer are both Hi-Speed USB and Wi-Fi. It also includes the Epson Remote Print capability so you can print when you’re on the go.
From our experience, the USB is the best way to connect when you’re using it as a sublimation printer. It is the most stable way to connect to your computer when sending your sublimation design for printing.

![]()
USB Printer CAble
Stop the printer errors from wireless printing lags with this USB 2.0 Printer cable. It offers a more stable printer connection from your computer to your sublimation printer.
With Wi-Fi and Remote Printing, even the smallest lag in connection will result in your sublimation print to be canceled. When this happens, you’ll only get a partial print of your design.
e. Borderless Printing Capability
The only type of borderless printing this printer is capable of is for the 4×6” Photo setting.
According to Epson’s manual for this printer, there will be a 0.12 inches or 3mm margin on all sides that is not printable. This means that your sublimation designs cannot be wider than 8.3 inches.

What’s In The Box
Inside the box, you’ll get the following:
- Ecotank Printer
- Manual — gives you a step-by-step, illustrated instructions on how to set up your printer
- CD-Rom
- Power Cord
- 1 bottle of each CMYK Ink
Since you will be converting this Ecotank to sublimation printing, make sure you set aside the CMYK inkjet ink right away. You don’t want to mistakenly fill the ink tanks with that instead of the sublimation ink.

Not interested in converting a printer?
Epson has their own sublimation printer that does not need to be converted, the SureColor F170.
- Great for both beginners and experienced sublimators
- Easy to set up and the best part
- Includes warranty and tech support
Read our review and find out why we give this printer a 5-star rating.
Sublimation Ink
Since you are converting a regular Epson inkjet printer to sublimation, your warranty will be voided once you add sublimation ink into it. You won’t be able to call Epson’s technical support for help or have them honor their warranty.
So when choosing which third party sublimation ink to add to this Epson Ecotank, the most important factor in deciding would be customer support. The prices are generally in the same ballpark between all of them but what makes one company stand out over the others is their customer service.
a. Cyclone Ink
We are currently using Cyclone Ink in this converted Epson ET-2803 sublimation printer. It was chosen because we prefer to support a small business in the USA who has great customer service. The owner, Jim, is very active in their company’s Facebook Page when it comes to answering questions from his customers. The moderators and group members are also helpful too.
In early 2022, Cyclone Ink released their version 2.0 and the best thing about this ink is that it is made in the USA! It may cost a bit more but we all know that American-made products have a higher quality so the slightly higher price is worth it.
We have multiple true sublimation printers such as Sawgrass and the Epson F170. We also had a converted Epson 1430 with sublimation ink from a company that went out of business. The colors from this converted Epson sublimation printer using the Cyclone Ink are comparable to our other printers.

Cyclone Ink for Converted Epson Printers
- Includes 85ml of each CMYK colors
- Small Business with a great customer service
- Fast shipping
- They have a selection of sublimation ink for many Epson printer models
P.S. I am NOT sponsored by Cyclone Ink to talk about or promote their ink. I am just a fan of their product and customer service!
b. Sublimation Ink From Amazon
There are various sublimation ink sets that can also be purchased from Amazon. They are all sold by third party sellers and most are fulfilled by Amazon themselves. Fulfilled by Amazon means that the ink is in their warehouse and they are eligible for a 1 or 2 day delivery using their Prime Delivery Service which includes a free 30-day trial.
Some of these third party ink sellers provide an ICC profile to use with their ink. You would have to contact the sellers directly for these downloadable profiles for your printer.
We also use Printers Jack Ink from Amazon. You can see this ink’s sublimation transfers and sublimated products as we use it in our Converted Epson ET-2400 Printer.

![]()
Printer’s Jack Ink

![]()
Hiipoo Ink
SetUp Process
The setup process is simple with the illustrated, step-by-step instructions that came with the printer. The same setup instructions can also be found from Epson’s website.
The most important part of the setup process when converting your Epson to sublimation printing is to put away the set of ink that came with the printer! Take it and hide it so you don’t accidentally use it to fill the ink tanks. You can sell it later since you have no use for them when it comes to sublimation.
Instead of adding the included inkjet ink into the printer, add your sublimation ink when you get to that step. This is the only step that needs to be done to convert this printer to sublimation printing. It’s simple to convert Ecotanks to sublimation!
Check out the video below on how to fill your converted Ecotank ET-2800 and ET-2803 with sublimation ink.

After you install your third party sublimation ink, follow the rest of the setup steps including loading the sublimation paper of your choice, downloading your printer drivers, connecting it to your computer using a USB cable, and running your first nozzle check.
You can also find out more information on how to run a nozzle check on page 156 of the printer’s manual.
Sublimation Paper
All sublimation papers are not created equal. Some are thinner than others, some are thicker, some have a watermark on the back, and of course, costs can vary too.
One thing that they all have in common is that they are specifically made for sublimation. They are not like your regular printer or copier paper. They have a special coating that accepts the sublimation ink so that it can be released to your sublimation blank when it is heated.
For this ET-2803 review, we used the Texprint DT Heavy Sublimation Paper.

![]()
Texprint DT Heavy Sublimation Paper
- Sublimation paper that can be used for a variety of printers and comes in many sizes.
- This is what we used for the print testing, see images of pressed blanks below.
Of course you are not limited to using the Texprint brand sublimation paper for your printer. There are other sublimation papers that can be used such as the following:

![]()
A-Sub Sublimation Paper

![]()
Koala Sublimation Paper

![]()
Printer’s jack Paper
We previously tested and compared the most common sublimation papers in the market. We used our Sawgrass SG800 printer, printed the same image using different sublimation papers. Find out the results of this sublimation paper comparison test.
Test Prints
Sublimation requires a ton of patience! This is especially true when you’re trying to figure out what print settings you need in order to get the sublimated results you are looking for.
It’s important to follow your sublimation ink’s recommended settings since it’s something that they’ve tested. But these settings may differ for everyone because of the graphic design software you use, the type of sublimation blank you’re pressing on, and your own computer screen settings.
The following settings are the base settings recommended by Cyclone Ink therefore, these were the starting point for our test prints:
- Paper — plain paper / bright white
- Print quality — High quality
- Color control by printer, not the software
The image we used for our test print is below. It was designed using Adobe Photoshop, 300 dpi, and saved as a jpg file. The jpg file was then opened and printed using various print settings combinations.
Adobe is just one of the graphic design softwares you can use to create your own sublimation designs. Check out this list of design apps and softwares for sublimation that you can use.

This JPG you see above is an RGB format as the computer screen only shows that format. Once you send it to the printer, it gets converted to a CMYK format.
Finding The Right Print Settings
As mentioned earlier, everyone’s settings can differ as we all have different computers, monitors, designs, heat presses, and sublimation blanks used. It is a good idea to test print and press until you have your desired outcome.
The image below shows the actual pressed coasters using different print settings.

We printed and pressed several sublimation prints until we found what worked for us. We used the George Knight DK20S Heat Press for this test but you can also use different types of heat presses for shirts.
The final pressed results we aimed for needed to be close to our what our computer screen showed.
When we say we tested several settings, we tested over 20 different setting combinations! Patience paid off as we found the setting that we are happy with.
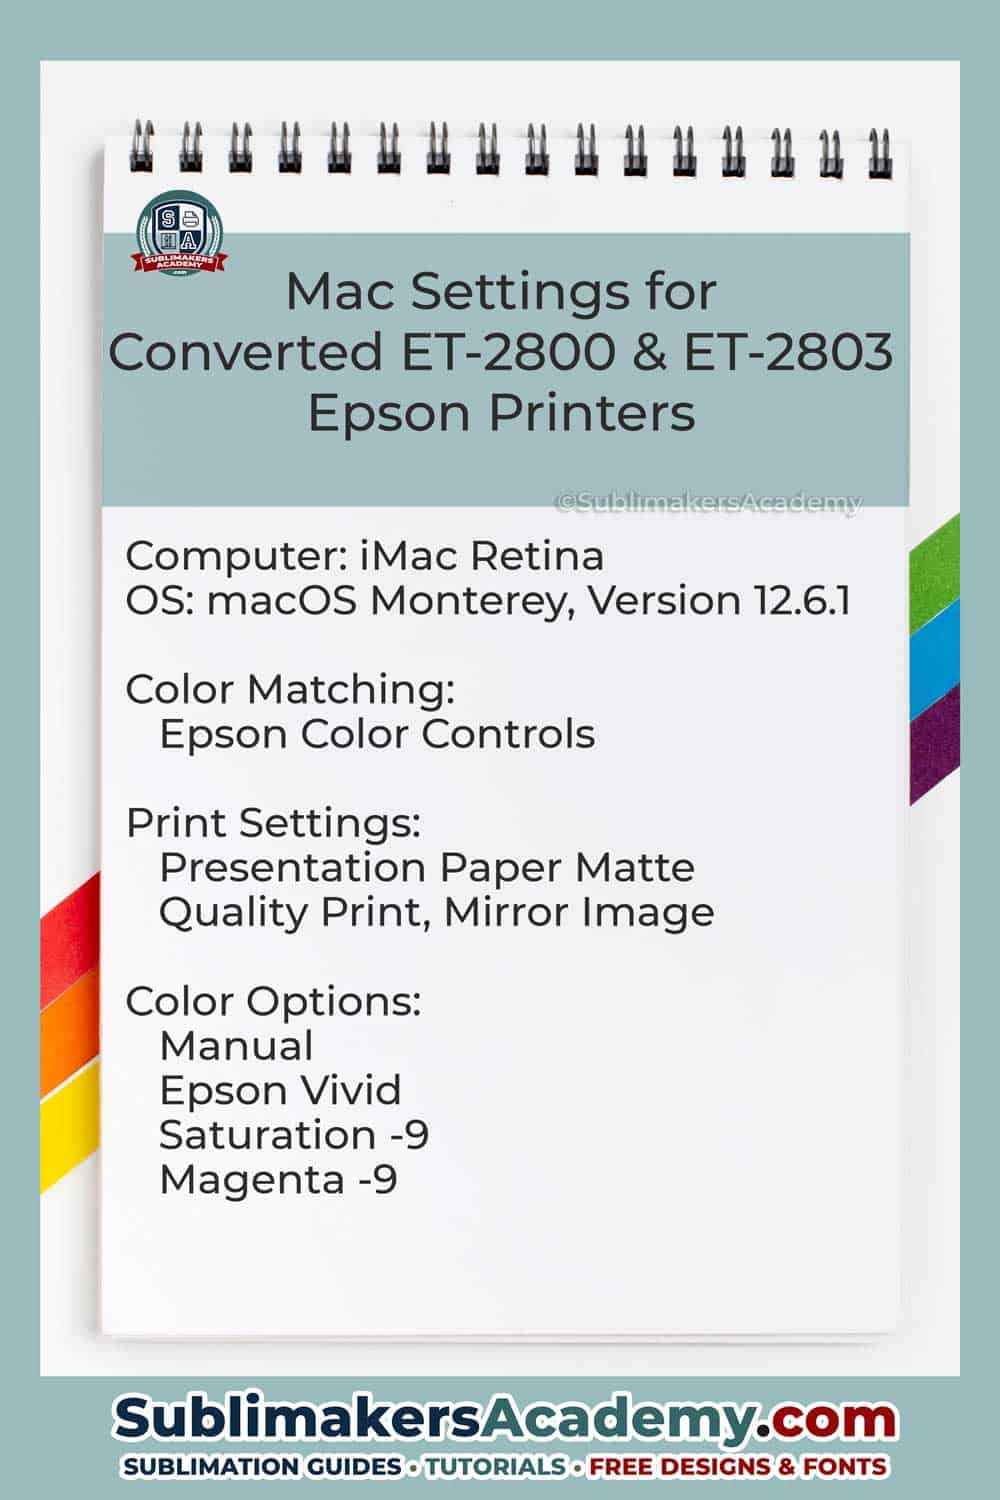
Mac Print Settings for ET-2800 ET-2803 Sublimation Printer
Our recommended printer settings for the Converted ET-2803 using Cyclone Ink printing from a Mac desktop or laptop is as follows:
- Color Matching — Epson controls colors
- Print Settings — Presentation Paper Matte, Quality Print, Mirror Image (if needed)
- Color Options — Manual, Epson Vivid, Saturation -9, Magenta -9
Steps on how to customize your Mac Print Settings:
1. Open sublimation design jpg.
2. Click on File → Print → Choose the ET-2803 Printer
3. Choose the appropriate paper size and scale to 100%
4. Click on the arrows to the right of Preview to open the drop down menu and select “Color Matching”
5. Click on “Epson Color Controls”
6. Open the drop down menu again and choose “Print Settings”
7. Choose “Premium Presentation Paper Matte” for Media type, “Quality” for Print Quality, and add a check box to “MIrror Image” if you need it mirrored. In our testing, there was no difference on the print quality when “Presentation Paper Matte” was chosen. So it’s your choice on which one you want to use.
8. Open the drop down menu and choose “Color Options”
9. Click on “Manual Settings” to choose it.
10. Click on “Advanced Settings” to open the window so you can set your own colors.
11. Mode: Epson Vivid 2.2, Saturation -9 and Magenta -9
Video on how to customize your Mac Print Settings coming soon. Subscribe to our YouTube Channel to know when it’s up.
Windows Print Settings for ET-2800 ET-2803 Sublimation Printer
Our recommended printer settings for the Converted ET-2803 using Cyclone Ink printing from a Windows PC is as follows:
- Paper Type – Plain Paper / Bright White Paper
- Quality – High
- ICC Profile – Epson IJ Printer 07
- Color Mode – Epson Vivid
- Color Correction – Automatic
- Bidirectional Printing – On
- Mirror Image – On (if needed)

Steps on how to customize your Windows Print Settings:
1. Open the sublimation design and click print.
2. Choose your ET-2800 or ET-2803 as the printer. The printing preference box should open.
3. Change the Paper Type to “Plain Paper / Bright White Paper” and Quality to “High”.
4. For the color settings, click on the “More Options” tab.
5. The “Automatic” setting usually has the correct color correction already. This is also where you can turn the Bidirectional Printing and Mirror Image off or on.
Bidirectional printing means the ink is laid down when the printheads pass over the paper in both directions. This increases the speed of printing. One issue with this is that if your sublimation design is saturated and full of color, the increased speed does not give your ink enough time to dry.
Wet ink can leave marks on your printer parts as it advances through the sheet feeder. You’ll notice smudges, smears, and roller marks also known as “Pizza wheels”. This is one of the issues that will test your patience.
To give your ink some time to dry and fix the “pizza wheel” problem, slow down the printing process by turning Bidirectional Printing to off (uncheck the box). Find out more on How To Fix The Most Common Sublimation Problems so you don’t end up throwing your printer out the window.
6. To check what “Automatic” color correction settings are set on your printer, select “Custom” and click on “Advanced”. A new window will open with your options.
7. In the Color Correction page, make sure “color controls” is chosen, color mode is “Epson Vivid” and leave all the adjustment settings to zero (0). Then click OK to go back to your printing preference window.
8. Save this preset so you don’t have to constantly change it every time you print. Click on Add/Remove Presets and a new window will open. You can name this preset and click save.
Congratulations, you’re now ready to print your sublimation design with your converted Ecotank sublimation printer.
Screen Images Versus Sublimated Images
You have to remember that what you see on your computer screen can look different that what you see when you sublimate the same image on a sublimation blank. There are various reasons for this including: brighter screen images, sublimation blank quality, and heat press quality.
Yes, heat press quality matters! If your heat press has an inconsistent heat, then you also end up with sublimated images that have blank spots. Find yourself a good heat press at an affordable price in our Sublimation Heat Press Buyers Guide.
Screen images will always be brighter than your sublimated image because the screen acts as a light source. Expect to have your sublimated image close but not 100% perfect. You can counter this difference by calibrating your screen.
Learn more about why your sublimated images are different from your monitor screens in our Sublimation Design Image And Color Basics You Need To Know.
It is also suggested to use an actual graphic design software when working with any sublimation designs. It can save your photographic, sublimation designs with an embedded color code.
Converted ET-2800 vs ET-2400
The Ecotank ET-2400 was released by Epson in the Fall of 2022. It is also an Ecotank printer that can be converted for sublimation printing.
Unlike the ET-2400, the ET-2800 and ET-2803 have an LCD display on the front of the printer. This display lets you access the printer’s functions such as test page print and nozzle check print. The ET-2400 works great for sublimation despite the lack of this LCD Panel.
The abscence of the LCD panel gives the ET-2400 a lower price than the ET-2800 printer. So this means the ET-2400 is even more affordable sublimation printer! Our comprehensive Converted EcoTank ET-2400 Sublimation Printer Review details how easy it is to convert, the sublimation ink we used, the print settings, and even the final pressed images of our test pieces.
Check out the kitchen towels we sublimated using the ET-2400 in this video tutorial. Despite the lack of an LCD screen like the ET-2800, it works well as a sublimation printer.

Final Results and Notes
Remember that your final pressed images will be slightly darker because the computer screen is brighter and acts as a backlight. Computer screens also only show RGB image colors and when printed by any printer, it gets converted to CMYK mode.
The computer screen we use is an iMac 5k retina, 27″ monitor that can display 5120 x 2880 resolution in RGB format. The printer used above is capable of 5760 x 1440 in a CMYK format.
When converting RGB to CMYK, the tones will be darker as it is not capable of the wide range of tones like the RGB is. Read more about the differences between RGB and CMYK images. The image below is the same exact file; designed in RGB mode (left image) and converted to CMYK mode (right image).

Summary
The Epson Ecotank ET-2800 and ET-2803 are inkjet printers that make a great sublimation printers. They are one of several Epson Printers that you can convert to sublimation. The only thing you need to do to convert it is to fill their ink tank with sublimation ink.
It’s an affordable sublimation printer that won’t break the bank and it has a small footprint so it won’t take up much room. This converted sublimation printer will let you create custom clothing, trendy accessories, home decor, and personalized gifts for friends and family. You can even start your own small business with this printer too!
Now that you have your printer, this list of the basic equipment you need to get started on sublimation will help with your shopping list. And when you’re ready to shop for heat presses, our Sublimation Heat Press and Sublimation Mug and Tumbler Press Buyer’s Guide will help you choose the right one.
Frequently Asked Questions

Updates & Social Media:
We often post on our social media channels when there are updates, tips and tricks, behind the scenes, and even great deals on sublimation blanks and equipment. You can also ask us your sublimation related questions too.
Facebook Page | Youtube | Pinterest | TikTok
*DISCLAIMERS: Any prices mentioned above are the price at the time of the original publication. These can vary, can fluctuate, and can change at any time. Please check the retailer for current prices.
We make every effort to make sure the above information is correct and up to date by doing our due diligence when performing our research. However, typos can occur and unintended mistakes happen. We are not responsible for any incorrect data published here.


Thanks so much for the information. I have a question, i apologize in advance if this was already mentioned. I’m already using the epson ecotank 2803 w included ink. How would I switch to sublimation ink without messing things up?
Hi Mandi,
You mean you already installed the Epson inkjet that came with the printer? You have to empty out the inktanks by using a blunt-tipped syringe then print full page bleeds to completely remove the ink from the lines. Then fill it with sublimation ink. You’ll have to print several full page bleeds again to make sure all the inkjet ink is out. I’m planning on making a video of this process soon so stay tuned.
I just bought the ET2803 and added the sublimination ink, but It doesn’t want to aligne. I have performed this several time. Can it be fixed?
Hi, what are you trying to align? Do you mean a nozzle check and the lines in it?
Once converted to sublimation printer can you use sublimation ink to print regular pictures and documents? Thank You
Hi Jessica,
Sublimation ink is dull when printed. It only becomes vibrant once it’s heated (heat press for sublimation). So if you print a regular picture of document, it will be dull and not vibrant at all. So no, you cannot use it as a regular printer anymore since it contains a different type of ink.
I am new to sublimation. And I have read many blogs from different people, but this one is my favorite. I really loved that you explained the whys and why nots. Thank you so much!
Glad you got some useful info from my explanations. Good luck with your new sublimation journey and have fun. Let me know if there’s anything I can help you with or even topics to cover in this website.
I don’t have the same dialogue boxes on my MAC. Do you know of any other resources?
Did you download the right driver for your Mac? How are you sending your images to the printer? What design program? Message us on Facebook so you can send me images of what your print screen option are.
I bought a brand new epson Connected to my computer Fill it with the sublimation ink and now it won’t print our copy So how do I fix that
Did you download and install the drivers? Can you check if the computer recognizes the printer?
Can you explain how i can convert this to be able to sublimate on dark fabric? Or is that not possible?
I have an SG500 but I need to sublimate on our grey work shirts for my husband’s company.
Thanks
The only way you can sublimate on dark fabric is if you have a Sawgrass printer that has the Easysubli ink. Or you can sublimate HTV and add that to the dark fabric. Here’s a useful post that discusses the different types of Sawgrass ink and what they’re used for.
I’ve been working in graphic design for years, but I’ve never suffered so much with color profiles. I converted my 2803 and have been doing several jobs, but at the same time I have had color problems, I use hiipoo paper and ink, they provide this profile, but it doesn’t work. I downloaded the one from 2806 and it comes close, but some colors show huge differences in the red area. I started searching now and found you, and this configuration of the epson vivid was awesome, it was fixed right away, I am very happy and thank you from the bottom of my heart. I did over 15 print variations and profiles all in the trash and boom… one tip and everything was fine. Thanks again.
I’ve tried and tested so many different color configurations and publish these posts to help others out. I’m glad you found it helpful. Stick around and I’ll share more helpful info.
I have the Epson Eco tank 2400 that I use for sublimation
It was working wonderfully until last week when a band of different color appeared on a sublimation design.
I figured that ink was low . I tried refilling tanks but ink will not go into the tanks at all. I cannot read the front of the tanks as it seems the ink has coloured them not allowing me to see. I used Hiipoo ink from Amazon.
Is it that the printer isn’t reading a chip code ???? I don’t know that there should be one
I’m new at this!!! What should I do
How can I fix this issue?
The ecotanks do not have a chip since it doesn’t accept any cartridges. What does the nozzle check look like? Is it missing any bands?